Qlik Sense Repository Database - Part 1
This is part 1 from a 3 part cycle Qlik Sense Repository Database under the hood, from this article you will learn how to connect to Qlik Sense database and why it may come in handy someday.
Why you want to know how to connect to QS Database Repository
To cover the part why you may find it useful let me re-phrase a quote from a movie Rocky Balboa® with Sylvester Stallone
“Qlik Sense Administration ain’t all sunshine and rainbows. It’s a very mean and nasty task… and I don´t care how tough you are, it will beat you to your knees and keep you there permanently, if you let it”.
Key here is the part – if you let it, having knowledge of what you can achieve with Qlik Sense database repository is sometimes a life saver.
Some examples what is possible with a little bit of SQL and schema knowledge:
- Changing multiple objects (sheets, stories etc.) owners and applications (if it can be done from architecture stand point);
- Using additional fields that are not available in neither QMC nor supporting monitoring applications;
- Changing sheets state – from self-service to community and to base sheet – possible also using EA power tools for QlikSense;
- Reviewing so called “soft deletes” records (especially in users and users attributes part – important in older releases – before 3.2);
- Getting specific application object “Engine ID” to use in custom URL for accessing just 1 particular sheet;
How to connect to QS Database Repository
In order to connect to repository database let’s recap the possibilities first. It will all vary of your Qlik Sense architecture, there are 2 options:
- Shared Persistence (standard and default from June Release 2017)
- Synchronised Persistence (standard before June Release 2017 – decommissioned with that release)
First one Shared Persistence will mean that Qlik Sense Repository Database is installed on 1 machine – it can be either your 1 and only machine for hosting Qlik Sense or a backend machine – responsible for hosting database and application reloads – or maybe a dedicated machine just for hosting Qlik Sense database. Second Synchronised Persistence will host Qlik Sense Repository Database on each and every machine that Qlik Sense is installed on, however there will be 1 machine that serves as a “Central” one – main machine that all others are communicating to and synchronising the changes.
My assumption in this article is that you are able to login using RDP (Remote Desktop Protocol) to your machine (if you are using synchronised persistence way of connecting will be the same – you need to determine which machine is main one in your case).
If you want to find out whether a particular machines has Qlik Sense repository database installed login to the server. Go to services: Win CMD -> Services (or using Task Manager in Services section) and look for: 
If it’s not there and you are on shared persistence, it means that “this is not the server you are looking for”. When you’ve located your “Qlik Sense Repository Database” service, let me tell you a secret – it’s a trap – what you see is in fact is a PostgreSQL Database Service. When it comes to version, Qlik Sense comes pre-installed with PostgreSQL 9.3 but I’ve heard on Qonnections 2017 that you can easily change the version – haven’t tested it though.
You have two options now to connect to the database, easy or the hard way.
Hard way (if you want to login from different machine in shared persistence environment) you would need to download PostgreSQL ODBC driver and connect to it or use an external tool pgAdmin III most likely – will not cover that in this article.
Easy way, when a tool comes packed with database – in this case PostgreSQL – I would expect to have it’s binaries, executables etc. and you have all of that there on your hard drive of your server. Location may vary depends on how have you installed Qlik Sense but by default it should be:
C:\Program Files\Qlik\Sense\Repository\PostgreSQL\9.3\bin
There you will find pgAdmin3.exe which is a client that provides excellent GUI for working with PostgreSQL, and one that will be used further in the article.
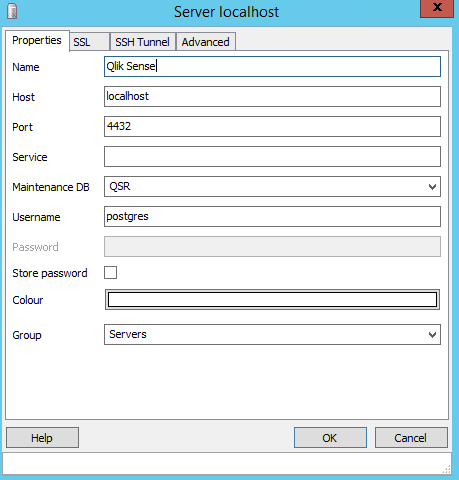
In order to connect to your database instance you will need 5 things
- Host: localhost (when you are connecting from within the server itself)
- Port: 4432 (default Qlik Sense port, not 5432 which is in general default PostgreSQL port)
- Database Name: QSR (default value for Qlik Sense)
- Username: postgres
- Password: password provided during installation of Qlik Sense

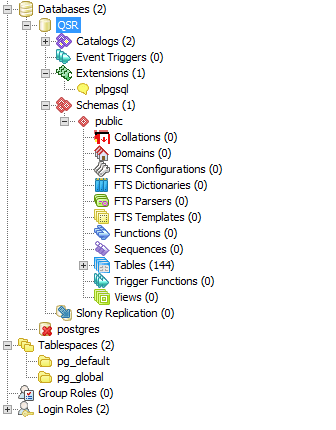
When everything was configured properly you will be able to login to your “Qlik Sense Repository Database” and will see a tree of tables, tablespaces etc. – remember here that with great power comes great responsibility. 
If you have different ways of connecting to your database, or different fancy usage options, please let me know.
Thanks,
Krzysztof
Want to be up to date with new posts?
Use below form to join Data Craze Weekly Newsletter!
